Запись Xilinx / Запись Xilinx
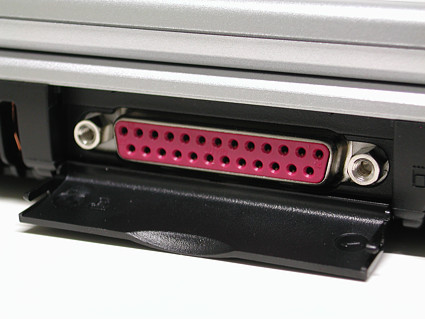
Прошивка производится через данные контакты:
Glitch board should be programmed using these contacts:

Что будем использовать?
What will you use for reading?
LPT Cable
AVR USB Flasher
What will you use for reading?
LPT Cable
AVR USB Flasher
Вы используете LPT кабель
You're using the LPT cable
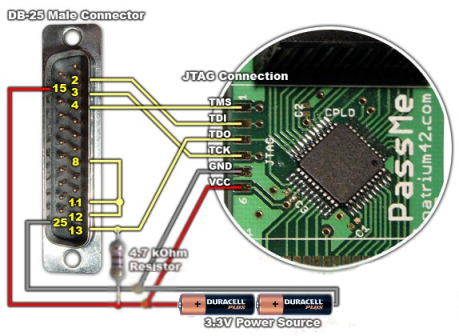
Подключите свою глич плату к LPT по данной схеме:
Connect your glitch board to LPT using diagram:
Скачайте архив с программой для программирования глич платы
Download the software pack for programming glitch board:
UrJTAG
Скачайте полный набор прошивок для glitch
Download the full glitch firmware package
RGH FW Pack
Из этого архива, вам понадобится файл(ы):
You need the file(s):
Если для вашей консоли файлов несколько, вероятно, придется перепробовать все и выбрать лучший
If there are several files for you console you can try all of them and choose the best
Переименуйте выбранную прошивку в fw.svf и скопируйте в папку с UrJTAG(для удобства)
Rename the firmware to fw.svf and copy it to the UrJTAG folder(for convenience)
Запустите jtag.exe, убедитесь, что LPT подключен и выполните набор команд:
Run the jtag.exe, make sure LPT is connected and execute sequence of commands:
cable EA253 parallel 0x0378 (where 0x0378 is your LPT port)
detect
svf fw.svf

You're using the LPT cable
Подключите свою глич плату к LPT по данной схеме:
Connect your glitch board to LPT using diagram:
Скачайте архив с программой для программирования глич платы
Download the software pack for programming glitch board:
UrJTAG
Скачайте полный набор прошивок для glitch
Download the full glitch firmware package
RGH FW Pack
Из этого архива, вам понадобится файл(ы):
You need the file(s):
Если для вашей консоли файлов несколько, вероятно, придется перепробовать все и выбрать лучший
If there are several files for you console you can try all of them and choose the best
Переименуйте выбранную прошивку в fw.svf и скопируйте в папку с UrJTAG(для удобства)
Rename the firmware to fw.svf and copy it to the UrJTAG folder(for convenience)
Запустите jtag.exe, убедитесь, что LPT подключен и выполните набор команд:
Run the jtag.exe, make sure LPT is connected and execute sequence of commands:
cable EA253 parallel 0x0378 (where 0x0378 is your LPT port)
detect
svf fw.svf
Вы используете USB флешер
You're using the USB Flasher

Соедините точки на глич плате с одноименными на флешере:
Connect the glitch board point to the same points on flasher:

Скачайте архив с NandPro для программирования глич платы, если у вас его ещё нет:
Download the NandPro for programming glitch board if you haven't it yet:
NandPro Скачайте полный набор прошивок для glitch
Download the full glitch firmware package
RGH FW Pack
Из этого архива, вам понадобится файл(ы):
You need the file(s):
Если для вашей консоли файлов несколько, вероятно, придется перепробовать все и выбрать лучший
If there are several files for you console you can try all of them and choose the best
Переименуйте выбранную прошивку в fw.xsvf и скопируйте его в папку с NandPro(для удобства)
Rename the firmware to fw.xsvf and copy it to the NandPro folder(for convenience)
Убедитесь, что флешер подключен и запустите NandPro 3.0a с параметрами:
Make sure flasher is connected and run NnadPro 3.0a with parameters:
xsvf: fw.xsvf

You're using the USB Flasher
Соедините точки на глич плате с одноименными на флешере:
Connect the glitch board point to the same points on flasher:
Скачайте архив с NandPro для программирования глич платы, если у вас его ещё нет:
Download the NandPro for programming glitch board if you haven't it yet:
NandPro Скачайте полный набор прошивок для glitch
Download the full glitch firmware package
RGH FW Pack
Из этого архива, вам понадобится файл(ы):
You need the file(s):
Если для вашей консоли файлов несколько, вероятно, придется перепробовать все и выбрать лучший
If there are several files for you console you can try all of them and choose the best
Переименуйте выбранную прошивку в fw.xsvf и скопируйте его в папку с NandPro(для удобства)
Rename the firmware to fw.xsvf and copy it to the NandPro folder(for convenience)
Убедитесь, что флешер подключен и запустите NandPro 3.0a с параметрами:
Make sure flasher is connected and run NnadPro 3.0a with parameters:
xsvf: fw.xsvf
Всё успешно записалось, продолжаем! / All is OK, continue!
Возникла ошибка при записи! / There were programming errors!
Возникла ошибка при записи! / There were programming errors!
Ошибка при записи может возникнуть при некорректном подключении, недостатке питания или неверно выбранном порте. Если вы используете LPT, попробуйте уменьшить сопротивление резистора и использовать питание 3.3 вольт от компьютера. Также, возможно, на вашей глич плате есть отдельный переключатель для режима программирования, используйте его.
Error while programming could be caused by incorrect connection, low power or incorrect port chosed. If you're using LPT, try to decrease resistor's resistance and use 3.3v PC power. Also your glitch board could has prog trigger, use it
Error while programming could be caused by incorrect connection, low power or incorrect port chosed. If you're using LPT, try to decrease resistor's resistance and use 3.3v PC power. Also your glitch board could has prog trigger, use it
